The steering knuckle is one of the main parts on the steering axle of the car, which enables the car to run stably and sensitively convey the direction of travel. One function is to effectively transmit the angle value of the steering wheel to the front wheel of the car, to control the route of the car in time to ensure the safety of the car; the other function is to bear the front load of the car, support and drive the front wheel to rotate around the kingpin. In the driving state of the car, it bears a variety of impact loads. Therefore, the steering knuckle not only requires reliable strength, but also must ensure its high machining accuracy. Its geometry is more complicated, more geometric shapes need to be processed, and the positional accuracy between each geometric surface is higher, and the processing precision will affect the steering precision in the running of the car. In this paper, through the analysis of the forgings produced by two different forging processes, the influence of the parting form, the allowance distribution and the forging error of the knuckle forgings on the machining process is discussed, and the fixture design and positioning surface are processed during the machining process. The choices and other aspects of the reference.
Knuckle structure features
The shape of the knuckle is relatively complicated, and the structural features of the four types of parts such as the shaft, the hole, the coil ring and the fork are concentrated, and the main components are composed of the support shaft, the flange and the fork. The structural shape of the support shaft is a stepped shaft, and the structural feature is a coaxial outer cylindrical surface, a conical surface, a thread surface, and a rotating body formed by a shoulder, a transition fillet and an end surface perpendicular to the axial line; the flange The part includes a flange face, a coupling bolt through hole and a threaded hole of a steering limit; the fork frame is formed by the upper and lower ears of the knuckle and the flange face.
From the point of view of the forging process, the characteristics of the knuckle forging are: the support shaft is slender, the flange is large and sometimes the profiled surface, and the fork frame and the support shaft center line are deflected by an angle α and the shape is complicated, according to GB12362- 2003 Steel die forgings tolerance and machining allowance, forgings are typical complex forks.
Knuckle machining process
The main process flow of the steering knuckle is: milling the end face of the journal, drilling the center hole at both ends → rough flange end face and support shaft journal → semi-finished car, fine car support journal, rounded corner, fine car flange, Thread at the end of the car→Drilling, tapping flange thread→Coarse, fine milling, upper and lower earrings, inner and outer end faces→ rough drill, fine boring main pin hole→surface hardening (as needed)→ fine grinding large and small bearing neck Rounded corners → markings → inspection, storage.
The effect of forging method on the processing technology
Forging method
There are two types of forging forming for the production of knuckle forgings: horizontal splitting (planar splitting) and vertical splitting (vertical splitting). The horizontal splitting is a forging method in which the center plane of the forging is a parting surface. Since the cross section of the supporting shaft portion and the flange and the fork portion are largely different, the billet is reasonably distributed during the forging process, which makes the billet very complicated. Even so, there will be a large flash at the joint between the support shaft and the flange, and will gradually decrease in the axial direction until the tail reaches the normal width. In this way, the material utilization rate of the forging is low. The vertical parting method is based on the center plane of the flange, taking into account the fork cavity on both sides. This forging method can adopt the closed forging technique in the pre-forging, the extrusion shaft part and the reverse extrusion side forks, and then the end Forging and discharging excess metal.
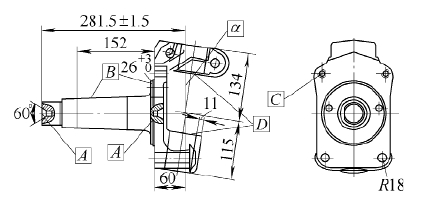
Due to the different production methods of forgings, the parting surface arrangement, the machining allowance distribution and the tolerance and thickness tolerance of the forgings have different effects on the machining of the knuckle. In particular, the center hole of the milling journal face is drilled, the car and the grinding support journal (see the machining of parts A and B in Fig. 1) and the flange end face, and the threaded holes on the machining flange that are coupled with the knuckle arm and the brake. And the process of processing the fork end part of the fork end face and the main pin hole (see the machining of C and D parts in Fig. 1) is particularly obvious, so the machining process design and the fixture positioning surface must be selected according to the forging The production methods are different and corresponding countermeasures are taken.

Figure 1 Schematic of the knuckle workpiece
2. Forging tolerance and machining allowance
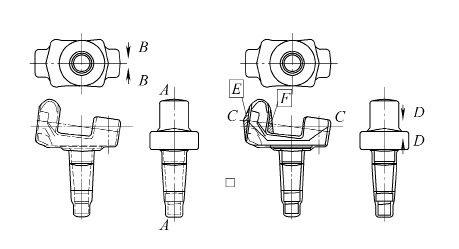
When using the horizontal split forging knuckle, the parting surface is usually selected at the largest section. As shown in Fig. 2, A-A is the parting surface of the forging, and the forging direction is perpendicular to the parting surface. Plane, that is, in the direction indicated by B-B. Thus, the forging is forged from the upper and lower molds. The machining allowance of the forging part is evenly distributed on the support shaft, the flange end face and the upper and lower fork end faces. The draft angle of the forging is along the forging direction, that is, the direction of B-B, generally 5° to 7°; in the forging process, the upper and lower molds cannot be affected by fluctuations of forging temperature and forging force. It is completely hit, so the thickness dimension fluctuation along the forging direction is formed on the forging, usually with a tolerance of ±1 mm; and the error due to the misalignment of the upper and lower molds is generally ±1.5 mm.
The parting surface of the vertical split forging is selected perpendicular to the support shaft and passes through the center of the flange, but the shape of the forging determines that the parting surface is a curved surface. It can be seen from Fig. 2 that the curved surface indicated by C-C is its parting surface, and the forging direction is perpendicular to the parting surface, that is, the direction indicated by D-D. The forgings produced in this way are different from the forgings produced by horizontal forging in the machining allowance distribution. Due to the drafting of the upper die forging, the inverted die is not formed, so the margin needs to be added on the inward side of the upper and lower forks. So that it forms a positive draft, the main part is shown in Figure 2, E, F parts. In addition to the normal addition of the support shaft portion, in order to facilitate the release of the support shaft portion, an additional draft angle of 1° to 1.5° is added along the axial direction, assuming that the support shaft length is 200 mm, due to the addition of the draft angle, the small shaft end The additional allowance for the outer neck of the flange support shaft will increase from 0 to 0.35 to 0.5 mm with an additional margin d = 200 tan (1 to 1.5). The forging thickness tolerance is usually ±1.5mm, which is generated along the D-D direction, and the error is generally ±1.5mm, which is generated perpendicular to the D-D direction.

Figure 2 Horizontal and vertical split forgings
3. Processing factors
The different effects of the above two methods for the production of forgings, such as the margin and tolerance, must be considered in the design of the machining process, otherwise it will affect the processing quality of the steering knuckle. The processing effects that need to be focused on are:
(1) Machining of the steering knuckle support shaft The main processes of the knuckle support shaft are the milling end face, the drilling center hole, and the journals of the car and the grinding parts (see parts A and B in Figure 1). These two processes are interrelated, especially the drilling center hole process. The center hole is not only the positioning reference for the subsequent machining support journal, but also the measurement standard for various dimensions and position tolerances on the support shaft. If the connection of the two central holes cannot be aligned with the axis of the support shaft forging during the machining process, the balance of the forgings may be unevenly distributed and the processing of the journal oxide scale (ie, the residual forged surface) may occur. Comparing the axial and neck positions of the forgings produced by the two methods, it can be seen that for the vertical splitting forged knuckle, since the final forging of the supporting shaft portion is formed in the cylindrical cavity, the roundness of the portion is good, The amount is even, and it is relatively easy to select the positioning position of the machining center hole. For horizontal forged forgings, due to the error and thickness tolerance, as well as the residual edge trimming factors, the part will form an irregular circle, and the distribution of the margin will be obviously fluctuated under the influence of multiple factors. Based on the shape fluctuation of the fore-neck position of the forging, it is necessary to consider the design of the V-shaped clamp along the direction of the parting surface in the direction of the machining center hole positioning position, so as to avoid the influence of residual and error of the flash. The center hole line is brought closer to the theoretical center line of the forging journal, so that the subsequent machining allowance is evenly distributed.
(2) Axial dimension of the support shaft The relationship between the axial dimension chains 281.5mm, 26mm, 60mm and 11mm of the steering knuckle shown in Figure 1 is interrelated. The wall thickness of the knuckle king pin hole is 11mm, which is especially important. The strength of the wall thickness of the main pin hole must be guaranteed. From the analysis of the relationship between the axial dimension chains, the fluctuation of the wall thickness should be considered from the different forging methods when the center end of the milling end face is drilled in the first machining process. If it is a horizontal forged forging, then the forging The axial dimension is produced in the upper and lower molds, and the main influence of the fluctuation is the forging error. In the case of forgings produced by vertical forging, axial part of the forgings are produced in the upper and lower molds, and the fluctuation of the axial dimension is mainly influenced by the thickness tolerance of the forgings, so the initial axial positioning is selected in this state. For the size, it is recommended to select the upper die produced by the same die as the wall of the main pin hole, that is, the flange face near the fork.
(3) Flange processing The flange part of the forged forged piece is formed in the complete cavity, so the shape error fluctuation is small. When the connecting hole around the flange is machined, the positioning of the center hole of the support shaft is accurate. The wall thickness around the connecting hole will be very uniform. For the forgings produced by horizontal forging, the flange part is formed in the upper and lower molds, and due to the influence of forging error and thickness tolerance, and according to the centering problem of the center hole analyzed above, it is processed. When connecting the holes around the flange, there is a risk of uneven wall thickness or even smallness around the hole. Care must be taken. If necessary, it is necessary to properly add a margin around the individual holes to avoid this risk. In addition, the thickness of the forged flange of the vertical forging is affected by the thickness tolerance of the forging, and the machining allowance of the flange end faces of different batches of forgings will fluctuate, which also needs attention during processing.
(4) The knuckle fork is processed because the support shaft portion of the knuckle has an angle α with its fork portion. When the knuckle is produced by vertical forging, the upper die part can be driven out without forming a plucking die. The cavity must be removed and the margin must be increased. In the E and F parts shown in Fig. 2, especially the margin of the F position is large, assuming α = 7 °, the depth of the fork is 70 mm, and the normal draft angle is 3 °, then the margin of the root of the fork is increased. It is: δ=70tan7°+70tan3°=12.2mm. In this way, in the process of fork processing, especially roughing, the large amount of cutting of the part must be considered; and the margin of the horizontal forged forgings in these parts can be arranged as usual, so the amount of cutting is small, but due to There is a draft allowance in the middle part of the two forks. In order to ensure the accuracy of the center hole, the part is generally subjected to face milling. In addition, when machining the fork part, it is usually positioned by the journal. For the forged part of the vertical forging, due to the influence of the error, the machining allowance of the fork part will change, and the machining allowance will be insufficient to produce the scale. .
Conclusion
Whether it is horizontal forging or vertical forging, it is widely used in the production of automotive steering knuckle forgings. For the knuckle produced by different methods, due to the different forming methods, machining allowance distribution and forging parting structure, the machining should be carried out in a targeted analysis, and measures should be taken according to different situations in order to carry out the central hole of the supporting shaft portion. Different positioning and cutting methods can be used in the processing, flange part processing and fork part processing, so as to obtain good processing technology.
Horticulture LED Grow Light
Ultra Plantâ„¢ Grow Light offers One Chip Technology aimed to meet your indoor growing expectation such as improve plants' quality, increase yield, or better the margin, etc., all for helping you realize a higher return on your crops.
Ultra Plantâ„¢ Grow Light is combined our advanced All-In-One technology with patented optical design and customized light full spectrum supported from our experienced LED engineers, plant specialists and other partners working on horticulture.
From Ultra Plantâ„¢ APP, you are able to schedule the growing process including photoperiod, brightness and spectral in advance. The lighting system will help you grow smarter, easier and better.
Ultra Plantâ„¢ is the most versatile horticultural grow lighting fixture for indoor plants with flexible full spectrum, brightness control and uniform, wider light distribution, suitable for top lighting of all types of crops. No matter it applies to anywhere for any crop, Ultra Plantâ„¢ can do perfect work for you.
Horticulture Led Grow Light,Horticulture Hlg Grow Light,Horticulture Led Grow Lights,Horticulture Lighting Group
Feton Corporation , https://www.ultraplantled.com

