The index leakage rate Q of the product sealability refers to the volume of gas leaking into the atmosphere at a certain measured pressure per unit time. According to the principle that the pressure changes due to leakage of components, the leakage rate is indirectly determined by the amount of change in flow rate and pressure. The formula for the leak rate can be obtained by incompressible gas, at a constant temperature, without a change in the measured volume, and without a drastic change in the measured pressure:

Where Q is the leak rate at standard atmospheric pressure;
△P——the amount of change in pressure drop;
V——volume volume to be measured;
Tm - test time;
Patm - standard atmospheric pressure.
If you want to ensure the establishment of the formula or the actual results are accurate and stable, some environmental and working conditions should be considered, including temperature, humidity, material of the workpiece, stability of the chamber to be tested, reliability of the plugging fixture, and The influence of the internal environment of the chamber on the airflow. The humidity, the material of the workpiece, the volume of the chamber to be tested, the internal environment of the chamber to be tested and the blocking fixture can be stably controlled by various means. However, temperature control is always the most difficult to solve, and it also has the greatest impact on the sealing test. On the one hand, although many companies conduct constant temperature and constant pressure control on the workshop, the ambient temperature of the workshop will vary greatly depending on the season, the temperature in the morning, the middle and the night. On the other hand, the workpiece is taken out from the machining center or the washing machine, and after the processes such as dehumidification and cooling, it can basically reach the ambient temperature. However, from the point of view of practical application and control of the beat, etc., in practice, there is often a case where the difference between the workpiece temperature and the ambient temperature is relatively large. So how do you solve the leakage caused by the large difference between the workpiece temperature and the ambient temperature?
It can be seen from the leak rate formula that the change in pressure is a key factor that directly leads to a change in the leak rate, and the change in temperature affects the change in pressure. According to Charlie's law, a certain mass of gas, when its volume is constant, its pressure is proportional to the thermodynamic temperature. According to the leakage rate formula, if the time and volume are constant, the leakage rate is proportional to the pressure. When the temperature rises, the pressure will increase and the leak rate will increase; the temperature will decrease, the pressure will decrease, and the leak rate will decrease accordingly.
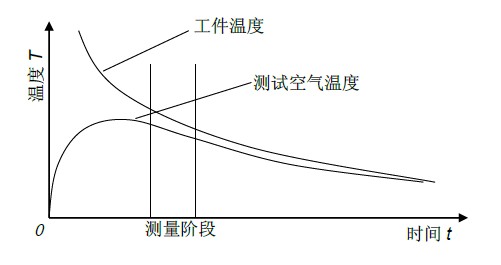
In the actual mass production process, the volume of the workpiece is basically constant, and the measurement time is always fixed according to the process regulations, so the most critical change is the change in pressure drop. When a workpiece enters the sealed test equipment from cleaning or other processes, if there is not enough time and means to keep the temperature of the workpiece consistent with the environment, then in the test phase, the surface of the measured chamber will quickly transfer the heat of the workpiece to the The test chamber air is measured to increase the pressure of the dry air in the chamber. Moreover, the longer the test time (the length of time in a short time), the more the air in the test chamber is heated up, the air pressure in the chamber will increase significantly with the increase of temperature, so that the pressure drop is increased, and the leak rate is correspondingly Increase. Therefore, the temperature of the heated air during the inflation process must be consistent with the temperature of the test piece before the actual leak begins. Because the temperature changes slightly, it will cause pressure changes in the test piece, and the test piece whose pressure changes can not make accurate leakage measurement. The temperature change trend of the workpiece temperature and the test air is shown in Figure 1. The temperature change process of the two is that the temperature difference between the two is large and tends to be consistent from the beginning.

figure 1
According to practical application, it is generally believed that the temperature of the workpiece and the ambient temperature are controlled at ±5 °C, and the influence of temperature change on the seal detection can be neglected. For example, some leakage requirements such as cylinder oil passage and engine oil passage are relatively high, and control requirements are compared. Loose workpiece. However, for those workpieces with stricter leakage rate requirements and relatively low leakage rate, such as high pressure oil passages in the cylinder block and high pressure oil passages in the casing, the temperature has a great influence on the sealing test.
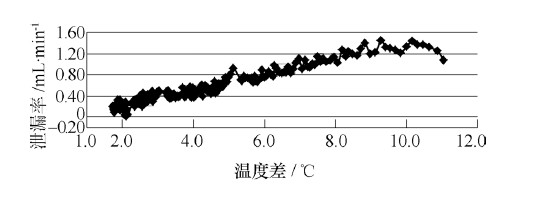
Through the following set of experiments, the concept of temperature compensation can be intuitively understood. Place a workpiece that differs from the ambient temperature (after cleaning and drying, or direct oven heating) into the equipment for sealing test, and record the leakage between the workpiece from the maximum temperature difference to the isothermal state consistent with the ambient temperature. value. For example, the workpiece is taken out from the washing machine and taken into the sealing test equipment. At this time, the workpiece temperature is about 31 ° C, and the ambient temperature is 20 ° C. The temperature difference between the two is around 11 °C. The measured result is that the leakage rate is 1.3 mL/min when the temperature difference is maximum (11 ° C), and the leak rate is 0.17 mL/min when the temperature difference is close to zero. The leakage rate difference between the two is about 1mL/min, which is 20% of the allowable leakage rate of the workpiece, and the requirement for the sealing equipment is that the maximum deviation of the accuracy cannot exceed 10%. That is to say, the temperature difference is too large, resulting in a large leak rate tested.
It can be seen from the leak rate-temperature difference curve (see Figure 2) that the leakage rate is significantly higher when the temperature difference exceeds 10 °C. Assuming that the workpiece itself leaks at the critical point, the workpiece is misjudged as unqualified and enters the infiltration or end-of-life program, which greatly affects the beat. This is unreasonable in terms of cost control and energy conservation.

Figure 2 Leakage rate - temperature difference curve
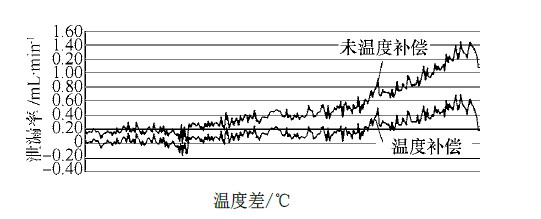
As shown in Fig. 3, the measured data after temperature compensation is closer to the true leakage of the workpiece, and the compensated data is basically distributed around the true value, while the uncompensated leakage rate distribution is relatively discrete.

image 3
In the sealing test process where the control leakage rate is strict and the temperature control is difficult, the temperature compensation effectively compensates for the leakage problem caused by the temperature difference to a certain extent, and improves the accuracy of the component leakage detection. Safety and quality assurance play an important role.
Shaoxing Grace International Trade Co.,Ltd , https://www.shaoxinggrace.com