4 Processing accuracy is increasing
Table 3 Accuracy of key parts of car engine
| Workpiece name | project | Numerical value | |
| cylinder block | Flatness of the top surface | 0.02mm/1000mm | |
| Cylinder hole aperture accuracy | IT6 | ||
| Spindle hole concentricity | f 0.01mm | ||
| Cylinder body depth | 0.01 to 0.02 mm | ||
| Cylinder head | Concentricity between inlet and outlet valve seat and conduit hole | f 0.02mm | |
| Catheter hole aperture accuracy | IT6 | ||
| Tool body positioning pin hole for cylinder block and cylinder head | Aperture accuracy | IT5 | |
| Pitch accuracy | +0.01mm | ||
| Gearbox | Drive shaft hole pitch accuracy | +0.02mm | |
| Aperture accuracy | IT6 | ||
| link | Head and hole | Aperture accuracy | IT6 (big head hole) |
| IT5 (small head hole) | |||
| Pitch accuracy | +0.01mm | ||
| Bolt positioning hole | Aperture accuracy | IT6 | |
| Pitch accuracy | +0.03mm | ||

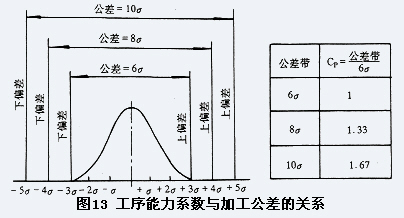
In particular, since the mid-1980s, the automotive industry has reinforced its manufacturing tolerances for critical parts of its engines (Table 3) in order to enhance the competitiveness of its vehicles, and to improve it through computer-aided measurement and analysis methods, as well as through equipment capability testing. The quality of its products. At present, in the acceptance of combined machine tools and automatic lines, it has been generally required that the process capability factor of the equipment is greater than 1.33, and some even require a process capability factor greater than 1.67 to ensure stable machining accuracy. It should be pointed out that the use of Cp ≥ 1.33 to accept the equipment, which actually tightens the manufacturing tolerances of the workpiece, that is, the actual machining tolerance of the workpiece is only 1/3 to 1/2 of the given tolerance of the workpiece (Fig. 13), which is undoubtedly It is a higher requirement for combination machine tools and automatic lines. In order to meet the high requirements of the user for the machining accuracy of the workpiece, the combination machine tool manufacturer, in addition to further improving the precision of the spindle components, masts, fixtures (including the dies), using new special tools to optimize the cutting process, using the tool size measurement control system In addition to a series of measures to control the thermal deformation of machine tools and workpieces, the application of hollow tool taper shank (HSK) and process statistical quality control (SPC) has become a new important technical means for automatic line improvement and monitoring of machining accuracy.

The hollow tool taper shank is a novel tool that uses radial (tapered) and axial (end) bidirectional positioning with the advantages of high bending stiffness, torsional stiffness and high repeatability. With a boring tool with a hollow taper on the machine, the IT7/IT6 precision holes can be machined using pre-aligned tools. Figure 14 shows an application example of a hollow tool taper shank on a cylinder bore fine tool.
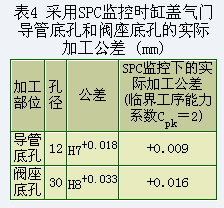
SPC is a method based on process capability for monitoring the quality of workpiece processing. At present, this quality assurance system is increasingly used on the automatic line to continuously monitor the quality of the entire production process. Table 4 shows the actual machining tolerances for the cylinder head valve bore and the seat bottom hole when monitored by SPC.

Next:
5 Comprehensive automation is increasing |
| Previous page | 1 | 2 | 3 | 4 | 5 | 6 | Next page |
Komatsu Electrical Parts,Komatsu Forklift Parts,Excavator Electrical Parts,Quality Komatsu Electrical Parts
JINING SHANTE SONGZHENG CONSTRUCTION MACHINERY CO.LTD , https://www.huaxinbrush.com